In the world of horse riding, a properly fitting bridle is essential for both the comfort of your horse and the effectiveness of your communication with them. Yet, getting it just right can sometimes be a challenge. That’s where our 8-step guide comes in handy! With straightforward instructions and practical tips, we’ll walk you through the process of fitting a bridle on your horse, ensuring a snug and comfortable fit every time. So saddle up, and let’s get started on how to fit a bridle on a horse and the journey towards better horsemanship!
These are the steps you should take to make sure you have a correctly fitting bridle.
Assemble the entire Bridle without the bit to the approximate size of your current bridle, if you don’t have one make up the bridle to the center holes but do not put the keepers through, so you can adjust them when the bridle is on the horse.
If you are concerned about how your horse may react, have an assistant with you and make the initial sizing over a headcollar first, which you can then remove to make smaller final adjustments. Once you are happy with the size, fit the bridle loosely over the horse’s head.
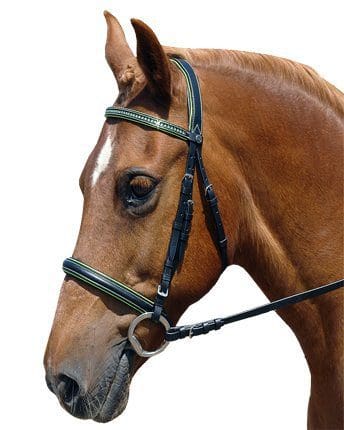
The horse head piece sits on top of the head behind the horse’s ears. At each end of the headpiece are the splits. If fitted correctly the splits should sit just below the browband.


Adjust the browband so that it sits about 1.5 cm on each side, below the base of the ear. The browband sits atop several facial nerves and blood vessels, so the fit must be correct. Too large a browband and the bridle may slip out of place. Too tight and the browband will put unnecessary pressure on nerves and pull the headpiece into the back of the ears. Ideally, you should be able to get two fingers (one on top of the other) to fit comfortably under your browband.
The throatlatch is one part of the split (the other part holds the cheekpieces) and is the strap that goes under the chin (chin strap). The throatlatch helps maintain the bridles equilibrium and should be tightened until you are still able to fit four fingers on top of each other between the throatlatch and the throat and four fingers sideways between the strap and the cheekbone.
The noseband should sit two fingers or 3 – 4 cm below the facial crest (shown in the images below). Any higher and the noseband will touch the facial crest (commonly referred to as the cheekbones) and cause the horse discomfort. Adjust and fasten the noseband so that the noseband is neither too tight nor too loose around the horse’s nose. You should be able to fit two fingers in between the horse’s nose and the noseband.


If your horse’s bridle has an additional flash strap, secure this around the horse’s nose so that the buckle rests a few centimetres under the tab that attaches it to the main part of the noseband. This is to ensure that the buckle doesn’t pinch the sensitive area around the mouth.
The cheekpieces for horses (one on either side) are attached to the headpiece and ultimately support the bit when it is in the horse’s mouth. Horse cheek pieces must be level on both sides and the length of the cheekpieces will be determined by the type of bit that you are using and whether your horse prefers a bit that sits higher or lower in the mouth. The cheekpieces should sit below the facial crest and you should have a minimum of one hole spare in case you need to shorten the cheekpieces.
Symmetry is extremely important when it comes to fitting a bridle. If the buckles do not sit in identical holes on either side of your bridle, then something is wrong. Once your bridle is in place, follow this simple checklist to ensure it fits correctly.

Only 1 left!
View ProductOnly 1 left!
View Product
Only 1 left!
View Product
Only 1 left!
View ProductAny strap of a bridle that can be adjusted via a buckle, should ideally sit in the middle hole. A horse bridle strap that sits on the last or first hole, leaves very little room for adjustment.
Once you are happy with the bridle fit, you may add the horse bridle bit and the reins, then proceed with putting the complete bridle on your horse. (see how to put a bridle on a horse) Ride your horse and make a mental note of any issues with the bridle, and make any adjustments necessary.
We hope that you have found this guide useful. If you are finding measuring a little tricky or would like a second opinion on the fit, you can always email us a picture of your horse wearing the bridle (front and side shots and close-ups preferable) and ask our thoughts on it. We’re more than happy to advise. You can call us on 01386833050, or fill out our contact form.
At Pink Equine, all our horse bridles are customisable and we take pride in the fact that riders are able to mix and match bridle parts with different sizes. This ensures that every horse can have a bridle tailored to its unique needs and dimensions, promoting comfort, performance, and overall well-being.
We’re also dedicated to building a vibrant and helpful community. Delve into more of our insightful featured articles below, for valuable tips and knowledge. And don’t miss out on joining our Pink Equine club – it’s completely free! As a member, you’ll gain access to exclusive competitions, stay informed with our newsletter, be the first to explore new ranges, and benefit from special discounts. Don’t wait any longer – join our community today and be part of the excitement!
For more information on horse bridles please view the articles below.


